Ads Google

Sabtu, 09 Juli 2011

Changing the Display Layout 3d MAX


For friends who are accustomed to using 3ds max software tutorials can share through this website. 3ds max software is widely used for architectural visualization ....

Architecture is not only about buildings, But also about the atmosphere created, the which touch our senses, feelings & souls ..
And computers help us virtually the sense, to be inside the architectural works ..

How to change the display layout:
Display the default layout in 3d MAX very tiring eyes if we work in a long time. Therefore it is necessary to change the layout.
The first step you should do is to click "customize", then followed by the menu "Load Custom UI Scheme".

After that it will be a window to select a layout that has been provided by the 3ds max.

After that then you can choose the look that has been provided in accordance with your wishes.
In this case it is better to choose the "view-dark.ui discreet". Then click Open.
Then changes the display changes to the version of 3d Max dark (dark)

advantages:
A dark color it will reduce the level of intensity of light emitted from the monitor screen. So our eyes will be more durable at the computer. In addition, dark colors on the monitor requires more power is small compared with the bright colors so that we can conduct electricity savings. It is to my knowledge can be applied to versions of 3ds max 5 and above.
- Johan - ilmugrafis -
Thanks to ALL VISITOR - Believe your Skill Friends

Good luck.
These tutorials are archived in the categories 3DS Max ilmugrafis
May be useful. Regards.


Minggu, 24 April 2011

Celebrating 20 Years of Linux [INFOGRAPHIC]

You’ve come a long way, Tux the Penguin.

The Linux Foundation is celebrating 20 years of the famous FOSS operating system, Linux — or GNU-slash-Linux, depending on how hard-line a fossie you’re talking to — with a slew of special events, both online and IRL. Linux enthusiasts can check out the official anniversary site for details.

The Foundation is also sharing a few other exciting news items, including:

  • The new High Availability working group, which will “help define the open-source HA stack and prioritize features.” A range of open-source projects and distros are participating in the working group.
  • The release of the Carrier Grade Linux 5.0 spec. This release addresses high-end data availability and security. According to the Foundation, “CGL is today a recognized standard for telecom equipment manufacturers who need to know their products will run on Linux.”
  • The Yocto Project‘s 1.0 release. This is the Yocto Project’s first major release since it began in late 2010. “Improvements to developer interface and build system are included in this common set of tools for building embedded Linux regardless of hardware architecture,” says a Foundation rep.

The landmark anniversary celebration is replete with digital goodies. If you’d like to pop a Linux Anniversary badge on your site, just use this handy HTML snippet:

You might also enjoy the commemorative infographic and video (titled The Story of Linux and featuring Richard Stallman in a cameo as St. IGNUcius) we’ve included below. Take a moment to look them over, and in the comments, reminisce with us about your Linux experiences over the years. I can still remember my first Red Hat box from early 2000 …

Click to see larger version.

Rendering with V-ray in 3d s Max

Posted by Alex

Step 1: The first step for this 3d rendering tutorial is to assign Vray as your 3d rendering engine. First Open or Reset Max. After that from the main toolbar select Rendering and Render Setup or simply pres F10 on your keyboard.

Step 2: With Render Setup window open select Common that and click on the 3 dots next to Default Scanline Renderer, chose Vray, in this case SP4 and click OK.

Step 3: In Top view create a Box. Go to command panel click on Create>Geometry select Box, click and drag to create it. Set the Length and Width of the box to 500cm and the Height of 10cm.


Step 4: To create our light simply click on Create>Lights, now select VRay and VRayLight. In Left view click and drag to create our light. Set the Half-length and width to 140, change the Multiplier to 7, leave the color to white(if you want you can try a bright yellow or blue) and check the box for Invisible.

Step 5: Using Select and Move Tool and Select and Rotate Tool position your light like i've did below. Click on Angle Snap Toggle(activating this you will be able to rotate from 5 to 5 degrees only) and rotate it 45 degrees and then move it in the corner.

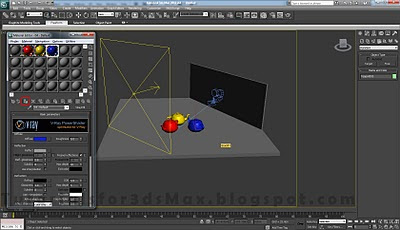
Step 6: Create another box like we did in step 3 only this time change the Length to 400cm, the Width to 5cm and the Height to 150cm. Use the tools we have used in step 5 and position it like i did in the next image.

Step 7: To create our main objects for this 3D Rendering example go to Create>Geometry and make 3 Teapots with the Radius of 25cm, 12 Segments and move the around like i've did.

Step 8: Our 3d Rendering scene needs a Camera. so go to Create>Camera and select Target. In Top view click where the camera position will be, move and release where the focus/target point will be.

Step 9: Press "C" on your keyboard to go to Camera view and use the tools in the bottom right corner to change the position of the camera like you see below.

Step 10: Right click on Camera in the top left corner and click on Show Safe Frame to activated it. We will now see the exact 3D Rendering Region of our scense. Again, use those bottom right tools to align it.


Step 11: Click on Material Editor in the main toolbar or pres "M" on your keyboard. Select the first material click on Get Material and from Materials>Vray select VRayMtl. Activate Show Standard map in Viewport.

Step 12: In main toolbar go to Select from Scene, Select Box 001 and 002 and click OK. Now from Material Editor click on Assign Material to Selection. Your two boxes are now Grey and have assigned the VRay material.

Step 13: We must create some reflective materials for our 3d Rendering scene so change the next 3 materials in Material editor with VrayMtl. Change our materials color to Red, Yellow and Blue. Change the Reflection color RGB to 150,150,150. Check the box for Fresnel Reflections and click on the L box next to it that will allow us to change the Fresnel IOR to 2.5 and the Max depth to 10. The Refl. glossiness must be 0.8.

Step 14: Apply each material to a different Teapot using Assign Material to Selection button.

Step 15: In the next image you can see my test 3D Rendering setting for VRay. Press F10 and change the Render Setup like i've did. For Image sampler(Antialiasing) change the Type to Adaptive DMC and the Antialiasing Filter to Catmult-Rom. In Adaptive DMC image sampler change the Max Subdivs to 8. In Color Mapping change the type to Exponential, check the box for Sub pixel mapping and Camp out. Now in Indirect Illumination check the box for "ON" to enable it, set the primary bounces to Irradiance map and secondary to Light Cache . For Iradiance Map change the Current Preset to Medium, check the box for Show calc. phase(check this in Light cache settings also) and Show direct light. In Setting change the Noise threshold for DMC Sampler to 0.05, Min samples to 16 and Global subdivs multiplier to 4. Set the Render region division to 32 for X and Y. If you don't want to see the Vray log every time you do a 3d Rendering test uncheck the box for Show window.


Step 16: In the main toolbar click on Render Production, the Teapot sign to make a test for our 3D rendering scene.

Step 17: This is what we have. Our 3D Render look's good so far.

Step 18: To add more reflection to our 3d Rendering Scene create a new light in the top view and position it like i've did below. Remember, the reflection position, like in real life, depends on the position of the lights cameran. So move it around if you want to achieve a different result. Change the Multiplier for this to 3.5, the Half-length to 50cm and Half-width to 100cm. Check the box for Invisible.

Step 19: You can see some new reflections to our teapots now.

Step 20: From some higher 3D Rendering Settings go in Render Setup and from Common change the resolution to 1600x1200. From Irradiance Map change Current preset to High, Interp. samples to 30. In Light Cache change the subdivs to 1500 and in Setting>DMC Sampler change the Adaptive amount to 1.0 and the Noise threshold to 0.01.

That's it, our 3D Rendering tutorial is finished. Well done. Here's the Final result:

PlayStation Network Down [PSN]???


Sony PlayStation 3 owners in multiple regions (including North America, Europe and Australia) are facing the inability to sign into the PlayStation Network online gaming service, corrupted user data and inability to play some games online or off. The problems are accompanied by the 8001050F error code.

When they try to load up certain games — including the just-released Heavy Rain — they receive the error code and the following message: “Registration of the trophy information could not be completed. The game will now quit.” After the message, the system reboots. The problems seem to mostly affect older, “fat” models of the PS3. Slim models are either not impacted or affected far less frequently.

Trophies are prizes given to players for accomplishing certain tasks in each game; the trophies are synced with the PlayStation Network so players can compare their achievements. Gaming blog Joystiq found reports that the consoles were having their dates reset to 12/31/1999; that might somehow be related to the trophy syncing problems.

Once reports of the problems started to appear, Sony tweeted: “We’re aware that many of you are having problems connecting to PSN, and yes, we’re looking into it. Stay tuned for updates.” That’s all we’ve heard from them so far. There’s no solution just yet; even disconnecting your console from the Internet doesn’t help. We’ll post an update immediately when we hear about a resolution.


Update: Service has been restored and the situation has been resolved. Consoles has incorrect leap year settings that were causing issues, but the issue has passed. PS3s should be operating normally now.

Rabu, 20 April 2011

Hacking the Web Raises Security Issues


If there is one thing people hate to put up with when they are online, it’s a hacker that disrupts web connections & even affects the files a user has on a computer. Here is a look at how hacking the web raises security issues & how hackers can be stopped so that these security issues won’t be a problem.

Hackers who hack the web can steal specific information that other groups may give to web-sites. This includes phone numbers that can be used to call people with unsolicited offers. In some cases, a hacker may have more control over the malware that’s used & therefore insert this program into a cell phone that’s listed on a web-site database. This can cause the hacker to steal even more phone numbers.

Three ways that hacking the web raises security issues is that it can generate dangerous programs. Hackers can easily insert malware in to a computer. This consists of files that can be damaging to the computer. The reason for these damaging capabilities is that a hacker can easily look through & edit files that are inside a website or the computer of a user on a website. Hacking the web raises security issues because it not only affects the websites involved, but it can also affect the users of the sites that have been affected.

In many cases, the hackers can send data to people on a contact list & this is then considered spam. They can send viruses & other pieces of malware that will only end up expanding the level of power that the hacker has. Some people may not know what to do with the emails that they get from a hacker because they may not know whether the message is legitimate. This makes it clear that hacking the web raises security issues.

A hacker can steal sensitive financial data, & this is another reason why hacking the web raises security issues. For people who are sending financial information & other important pieces of data to a web-site, the information can be important. This includes not only credit card numbers & other information regarding these cards but also Social Security numbers.

Having the appropriate antivirus program is needed. A typical firewall program will have all of this information. This can be used for a server as long as the program will automatically update itself as new information on viruses & other dangerous things that hackers may have to gain access to a web-site or your computer are known. With automatic updates, you will be more protected.

g i jane movie download

It’s clear that hacking the web raises security issues. By taking care of these risks with a quality firewall & antivirus program & by recognizing how hackers work will make it easier to handle hackers & any other dangerous things that may come around.


Senin, 25 Januari 2010